How to Decorate Google Calendar in Six Steps
Learn how to decorate Google Calendar in six steps, from the free color set and 11 event colors to dark mode and background images. A beginner friendly guide.
Introduction
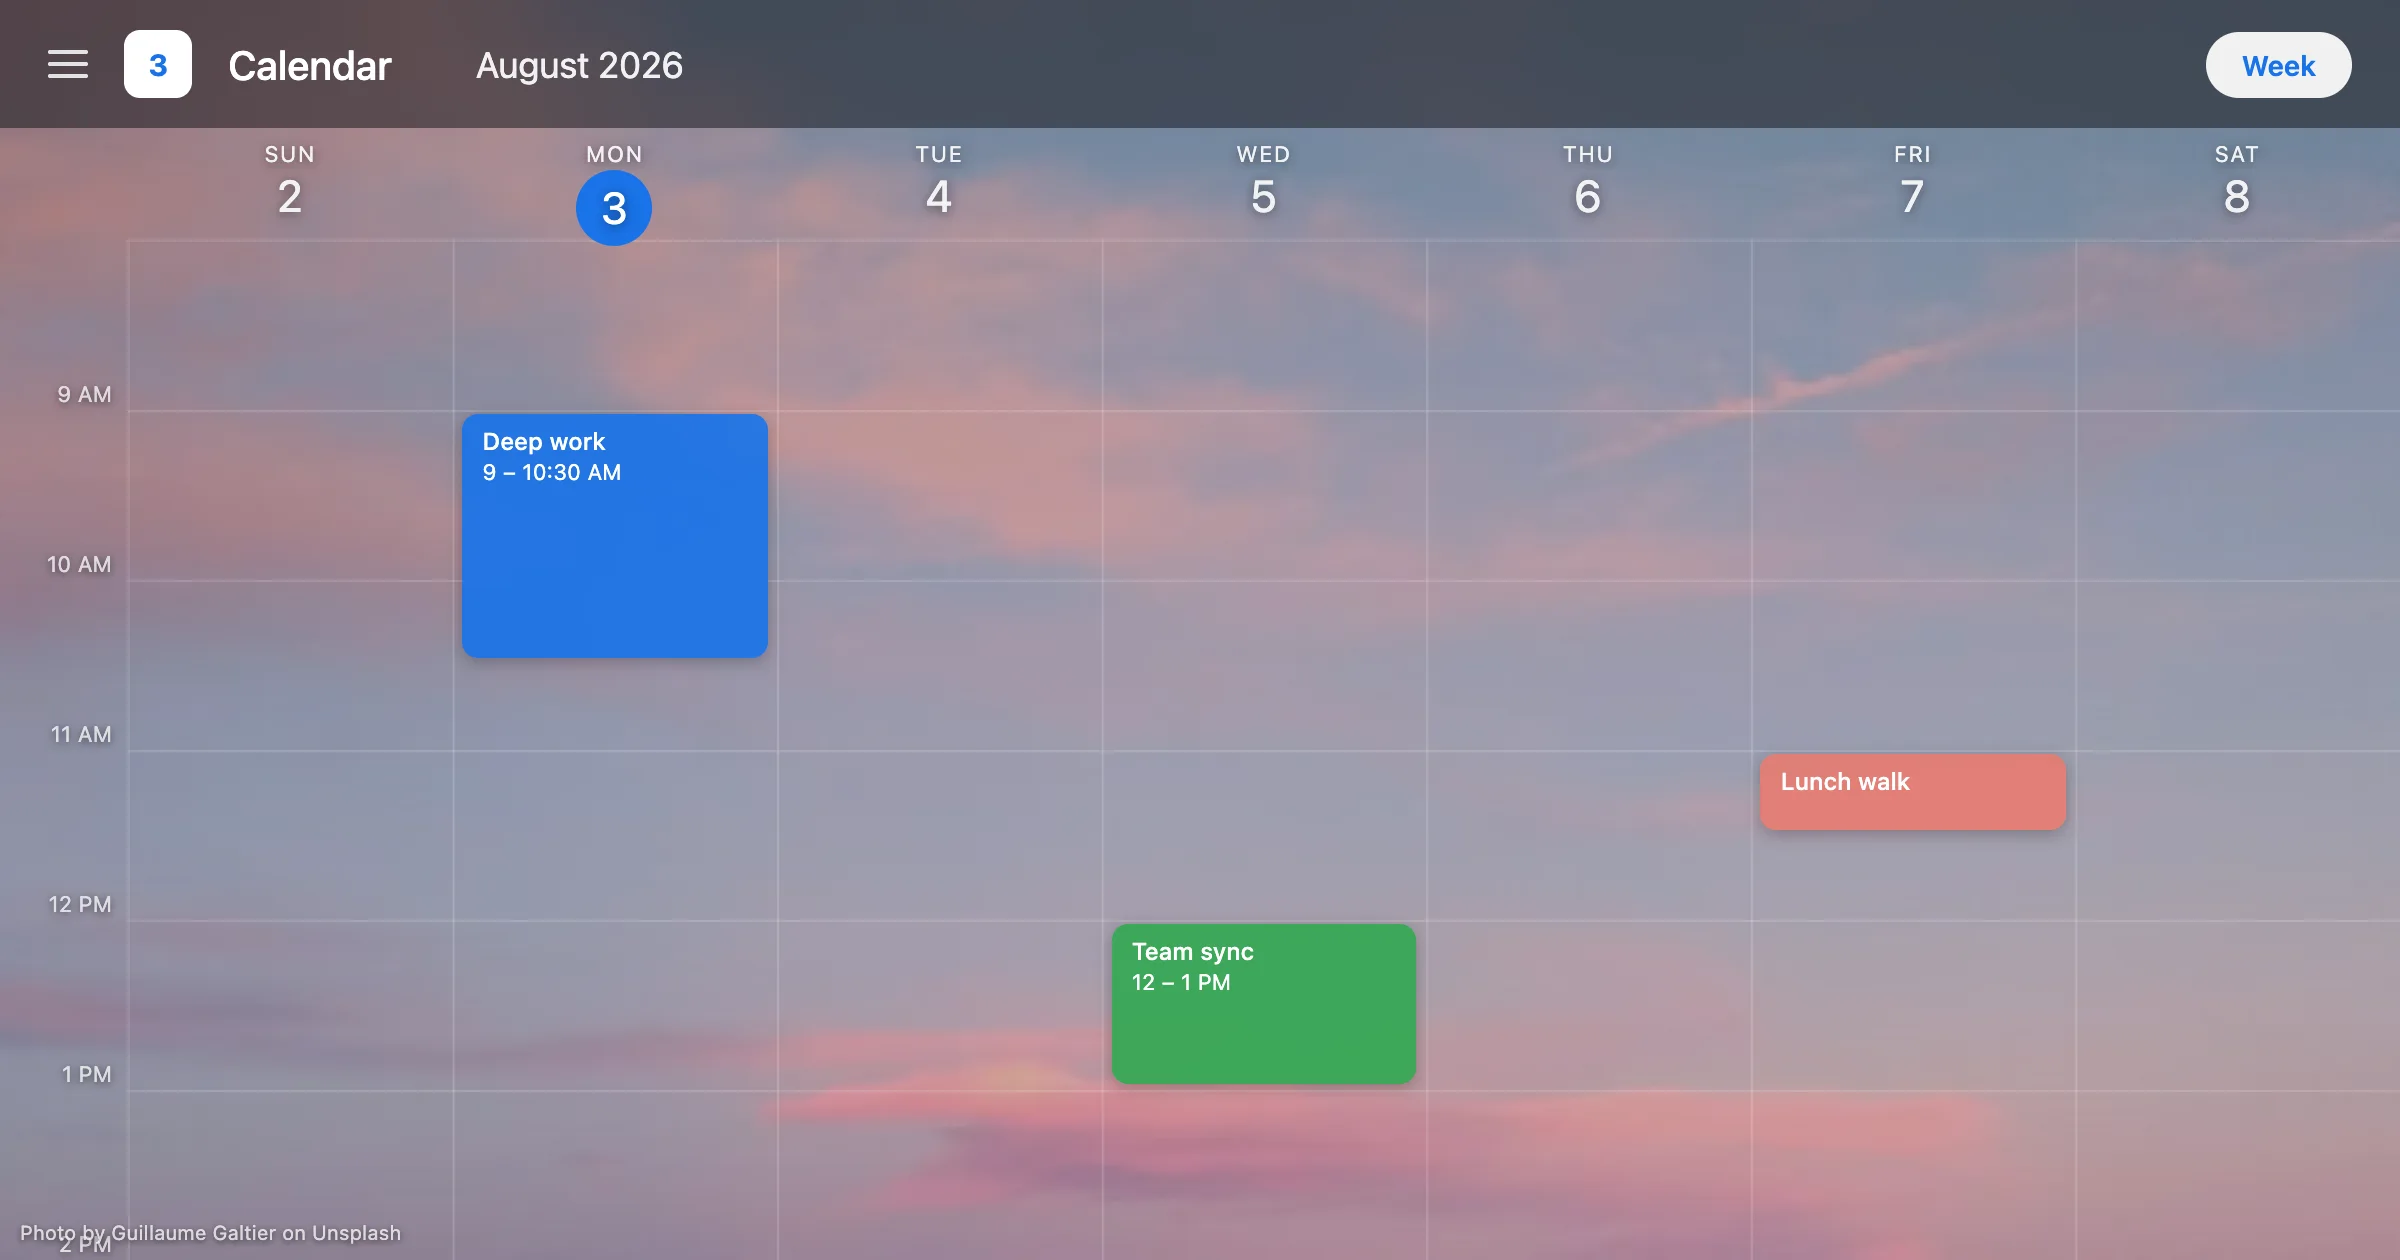
To decorate Google Calendar, open the Settings gear icon, choose "Density and color", and pick a color set. Then assign the 11 event colors, turn on labels, switch to dark mode, and add a background image.
Four of those six steps are free. They are built into Google Calendar and need no extension, no account, and no payment. Most guides skip them and push an install link in the first paragraph. That is the wrong order. Most of the visual change comes from the free settings. Only the background image needs an extension, because Google Calendar cannot do that on its own.
Disclosure: CalendarBG, the publisher of this blog, builds Backgrounds for Google Calendar, the extension referenced later in this guide.
This guide assumes you have never opened the Google Calendar settings panel. Every step is in order. You can stop after any step and still have a better looking calendar.
Quick Answer
How to Decorate Google Calendar
Open Google Calendar in a desktop browser. Click the Settings gear icon, then choose "Density and color". Pick your color set and your density. Next, open any event and assign one of the 11 named colors: Tomato, Flamingo, Tangerine, Banana, Sage, Basil, Peacock, Blueberry, Lavender, Grape, or Graphite. Add labels to track entries. Switch to dark mode if you work at night. Finally, install a browser extension to place a background image behind the grid. Google Calendar has no native background image upload.
What Google Calendar Lets You Decorate by Default
Google Calendar ships with a plain white grid. That is a design choice, not a bug. The grid is built for scanning, so the interface stays quiet and the events stay loud. The result is a calendar that works well and looks like every other calendar on the planet.
The two native appearance controls
Google Calendar gives you two appearance controls in one place. Click the Settings gear icon in the top right, then choose "Density and color". Inside that panel you set the event color set and the display density.
The color set switches the palette used for your events. Google offers a Classic set and a Modern set. Classic uses stronger, more saturated tones. Modern uses softer tones that sit further back on the page. Density controls how much vertical space each row takes. A tighter density fits more of the week on one screen. A looser density gives each event more room.
These two controls are free, instant, and reversible. Google documents the panel itself, and it is worth reading once for the exact button names: Change event color set and density in Google Calendar.
The 11 named event colors
Google Calendar gives every event one of 11 named colors. The full list is Tomato, Flamingo, Tangerine, Banana, Sage, Basil, Peacock, Blueberry, Lavender, Grape, and Graphite. These names also appear in the Google Calendar API. A developer and a designer mean the same swatch.
Eleven is a small number, and that is the point. A fixed palette keeps your calendar readable, because your eye learns eleven colors fast. Most people use two or three by accident. Using them on purpose is the largest free improvement you can make.
What Google Calendar cannot do natively
Google Calendar has no background image upload. There is no wallpaper field, no theme store, and no way to point the app at a photo on your computer. The color set and the density settings are the native visual controls, and that is the whole list.
This is why every "aesthetic Google Calendar" screenshot with a photo behind the grid was made with a browser extension. Knowing that boundary saves you from hunting for a feature that is not there. For a wider tour of what is possible, see the Google Calendar themes and customization guide.
Summary: Google Calendar has two native appearance controls in the "Density and color" panel: the event color set and the display density. Open that panel from the Settings gear icon. Google Calendar also gives every event one of 11 named colors, from Tomato to Graphite. It has no background image upload of any kind. That single gap separates a free makeover from an extension-based one, and it defines every step that follows.
Customize Your Google Calendar
Add beautiful backgrounds to your calendar with CalendarBG. Free to try, no credit card needed.
Add to Chrome — FreeHow to Decorate Google Calendar for Free in Four Steps
These four steps cost nothing and need no extension. Do them in order. Each one takes a few minutes and each one is reversible, so you can experiment without risk.
Step 1 and Step 2: the color set, the density, and the 11 colors
Start with the panel. Click the Settings gear icon, choose "Density and color", and try both color sets. Look at a busy week, not an empty one. Classic reads bolder on a white background. Modern reads calmer and pairs better with a photo background later. Then set the density. Pick the tighter option if you want the whole week visible without scrolling.
Now the part that changes everything. Assign the 11 event colors on purpose. Open an event, click the color swatch, and pick a color that means something. A working system looks like this. Deep work gets Blueberry. Meetings get Tomato. Personal and family time gets Sage. Admin and errands get Graphite. Anything tentative gets Banana.
Four or five colors is enough. Keep Graphite for the low-value items you want to fade back, because it is the quietest swatch in the set. When you open your week, the shape of your time should be visible before you read a single word. That is the test.
Two rules keep this system alive. First, write the rule down somewhere, or you will drift within a week. Second, never assign a color to a single event as decoration. Colors are categories. For a full worked system with a starting palette, read the Google Calendar color coding guide for 2026. That post is the gallery version of this procedure.
Step 3: labels for tracking entries
Google Calendar supports labels for tracking entries. Labels sit alongside colors and answer a different question. A color tells you what kind of block this is at a glance. A label tells you what it belongs to when you go looking later.
Use labels for anything you want to count or review at the end of a month: client work, study sessions, gym, travel. The official documentation covers the current behavior: Use labels to track calendar entries.
Labels are the least decorative step here, and I nearly left them out. They earn their place because a calendar that looks good but tells you nothing gets abandoned in three weeks.
Step 4: dark mode
Dark mode is the fourth free change and the one people notice most on a laptop at night. A dark interface lowers the glare of a full-screen white grid. It also makes the Modern color set look richer.
The "Density and color" panel handles the color set and the density. Dark appearance is set separately, and the process differs by platform. I wrote a dedicated walkthrough instead of compressing it here: how to customize Google Calendar dark mode.
One warning before you go further. Dark mode plus a dark background image is a common mistake. Pick one dark surface, not two stacked on each other. I cover that failure below.
Summary: Four free steps decorate Google Calendar with no extension and no payment. Set the color set and density under "Density and color". Assign the 11 named event colors as categories. Turn on labels to track entries. Switch to dark mode. Assigning colors on purpose delivers the largest single improvement. Finish all four before you consider a paid tool, because step five only looks good on top of them.
How to Add a Background Image to Google Calendar
Steps 1 through 4 cost nothing. Step 5 is where the free path ends. Google Calendar has no background image upload, so a photo behind your grid needs a browser extension that adds the layer for you.
Step 5: install an extension and pick a background
A background extension works by injecting a styling layer on the calendar page in your browser. Nothing changes on Google's servers. Your events, sharing settings, and other devices are untouched. Uninstall the extension and your calendar returns to the plain grid.
This is where we recommend our own tool, and the disclosure above applies. Backgrounds for Google Calendar is the Chrome extension our team builds and publishes. It is at version 44.0.1, with 340+ users and a 5.0 rating from a small number of reviews. The built-in image library is powered by Unsplash. The free tier returns 10 background results per search. We set that limit at 10 on purpose, so the free tier stands on its own.
Some practical notes on picking an image. Choose photos with a calm area in the middle, because that is where your events sit. Landscapes, gradients, textures, and out-of-focus shots work. Busy photos with faces or text do not. For a starting shortlist, see the best Unsplash backgrounds for productivity. The Unsplash License explains the usage terms behind the library.
On permissions, check what any extension asks for before you install it. Mine requests storage, identity, and activeTab. The content script is scoped to calendar.google.com only, so it does not run on other sites.
Step 6: your own photos and scheduled rotation
Step 6 is optional and it is the paid tier. Two features live here: your own Google Drive photos as backgrounds, and scheduled auto-rotation of your favorites.
The Drive connection uses a read-only scope (drive.readonly). It can display your photos and cannot modify anything in your Drive. Rotation swaps your background on a schedule, so your calendar changes through the week without you touching it. The Google Drive photos as calendar background guide covers the setup.
PRO costs $3.99 per month, or $24.99 per year against an annual list price of $47.88. There is a 7 day free trial of PRO. If a subscription lapses, only the PRO-sourced backgrounds stop: Drive photos and scheduled rotation. Images from the free library keep working.
Do you actually need step 6
Most people do not. Step 5 with the free library covers the visual change. Step 6 is for people who want personal photos, or who want the view to change on its own. Try the free tier for a week first. The free versus PRO comparison splits it feature by feature. The hub page on what CalendarBG is and how Google Calendar backgrounds work explains the mechanism in more depth.
Summary: Google Calendar cannot set a background image natively. Step 5 needs a browser extension that adds a styling layer inside your browser. The free tier of our extension returns 10 background results per search from an Unsplash-powered library. That is enough for most setups. Step 6, using your own Drive photos and scheduled rotation, is optional and paid. Start free, and upgrade only if rotation matters to you.
Google Calendar Makeover Steps Compared: Cost, Effort, and Best For
Here is the whole makeover in one table. Read the cost column first. Four of the six steps are free, and the two paid ones sit at the bottom for a reason.
The comparison table
| Step | What it changes | Cost | Difficulty | Best For |
|---|---|---|---|---|
| 1. Color set and density | Event palette (Classic or Modern) and row spacing | Free | Easy | Anyone opening Google Calendar settings for the first time |
| 2. The 11 event colors | Meaning of every block on your grid | Free | Easy | People whose week looks like undifferentiated blue boxes |
| 3. Labels | Tracking and reviewing entries later | Free | Easy | Freelancers and students counting hours by category |
| 4. Dark mode | Overall interface brightness | Free | Easy | Night workers, and anyone bothered by a bright white grid |
| 5. Background image | A photo behind the whole calendar grid | Free tier: 10 results per search | Easy, needs an extension | People who want the screenshot-worthy look |
| 6. Own photos and rotation | Drive photos plus scheduled auto-rotation | $3.99/month or $24.99/year | Medium, needs a Drive connection | People who want personal photos or a weekly change |
Reading the table: free first, extension last
The first four rows change how your calendar communicates. The last two change how it feels. Both matter, but the order is not interchangeable. A background photo behind a chaotic, single-color grid looks worse than the plain default. The photo adds visual noise to a layout that already has too much.
Fix the meaning first. Then decorate the surface.
Honest pros and cons
Steps 1 and 2 have almost no downside. The only cost is the ten minutes it takes to decide what your colors mean. Step 3 adds a habit, and habits fail. Skip labels if you know you will not review them.
Step 4 has one real drawback. Dark mode reduces the contrast of some softer event colors, so Banana and Sage can get harder to read. Check your busiest week after switching.
Step 5 depends on a browser extension, which is a real dependency. It runs only in the browser where you installed it. Your phone and your work laptop will look different. That is the honest tradeoff for a feature Google does not offer.
Step 6 adds a subscription. A subscription is worth it only if rotation or personal photos change how you feel about opening the app. For a broader view of what else is worth installing, see the best Chrome extensions for Google Calendar.
Summary: Four of the six Google Calendar makeover steps cost nothing: the color set, the 11 event colors, labels, and dark mode. Only step 5 needs an extension, for a background image. Only step 6 costs money, at $3.99 per month or $24.99 per year. Do the free steps first, because a photo behind a badly organized grid looks worse than the plain default. Decorate the surface only after the grid means something.
Common Mistakes When You Decorate Google Calendar
Most calendar makeovers fail in the same four ways. Each one is easy to avoid if you know about it before you start.
Using all 11 colors at once
The 11 named colors are a menu, not a checklist. When every event has its own color, none of them mean anything, and your week turns into confetti. Pick four or five and hold the line. Tomato, Blueberry, Sage, and Graphite is a solid starting set. Those four stay distinct at small sizes.
The related mistake is assigning colors by mood instead of by category. A color system only works if the same kind of event always gets the same color. If you cannot state your rule in one sentence, you do not have a system yet.
Paying before doing the free steps
I sell a paid tier and I still say this: do not pay first. Steps 1 through 4 cost nothing and produce most of the visible change. Install a background extension on day one, skip the color work, and you get a prettier version of the same unreadable grid.
There is a 7 day free trial of PRO for a reason. Use the free tier, finish the free native steps, then decide whether Drive photos and rotation are worth $3.99 per month to you.
Choosing a background that fights the text
This is the most common failure at step 5. Your events sit in the middle of the screen. A photo with high detail, strong text, or a bright center will compete with them.
What works: soft gradients, distant landscapes, textures, night skies, and blurred images. What fails: portraits, product shots, screenshots, and anything with writing on it. Also avoid a dark background image under dark mode, since the events lose their edges. For ideas that survive real use, read aesthetic Google Calendar setup ideas. That post is the idea gallery to this article's procedure.
Expecting the look to follow you everywhere
A browser extension changes your calendar in that browser only. Your phone app, a second computer, and a colleague's screen all show the default view. People are surprised by this, so plan for it. Set up the browser you actually work in, and treat the phone as a separate surface.
One more mistake: rebuilding the whole system every few months. Set your colors, write the rule down, change the background when you get bored, and leave the structure alone. The decoration is the part that should change. The meaning should not. For more small wins that stick, see Google Calendar tips and tricks for 2026.
Summary: Four mistakes are common when you decorate Google Calendar. The first is using all 11 event colors at once. The second is paying before you finish the free native steps. The third is a busy background photo that competes with event text. The fourth is expecting a browser extension to change the mobile app. Pick four or five colors, keep Graphite for low-value blocks, and use calm images. Fix the meaning of your grid before you decorate its surface.
Key Takeaway
Decorating Google Calendar in Order
Decorate Google Calendar in cost order. Set the color set and density under "Density and color", assign the 11 named event colors as real categories, turn on labels, and switch to dark mode. All four are free and built in. Only then add a background image, which needs a browser extension because Google Calendar has no native upload.
Frequently Asked Questions
About Decorating Google Calendar
Can I decorate Google Calendar without installing anything?
Yes, for four of the six steps in this guide. Google Calendar has a native event color set and a density setting. Both live under the Settings gear icon, in the "Density and color" panel. You can also assign any of the 11 named event colors and turn on labels without installing anything. Only the background image step needs an extension, because Google Calendar has no background upload feature.
How many colors does Google Calendar have?
Google Calendar has 11 named event colors. They are Tomato, Flamingo, Tangerine, Banana, Sage, Basil, Peacock, Blueberry, Lavender, Grape, and Graphite. The same names appear in the Google Calendar API, so they are stable across the product. Google also offers two color sets, Classic and Modern, which change the tone of those swatches. Using four or five of the 11 consistently works better than using all of them.
Why can I not upload a background image in Google Calendar?
Google Calendar does not include a background image upload. The native visual controls are the event color set and the density setting, and that is the full list. Any calendar screenshot with a photo behind the grid was made using a browser extension. That extension adds a styling layer in the browser. The change is local to your browser and does not alter your events or your account.
Does a background extension change my calendar for other people?
No. A background extension applies a visual layer inside your own browser only. Your events, invitations, and sharing settings are untouched, and nobody else sees the change. The same applies to your phone, where the mobile Google Calendar app shows the default view. Set up the browser you work in, and treat other devices separately.
What does the free version of a Google Calendar background extension give me?
In our extension, the free tier returns 10 background results per search. The image library is powered by Unsplash. We set that limit deliberately, so the free tier is usable on its own rather than a teaser. The paid tier removes the cap and adds your own Google Drive photos plus scheduled auto-rotation of favorites. There is a 7 day free trial of the paid tier if you want to test rotation first.
What happens to my backgrounds if I stop paying?
Only the paid-tier backgrounds stop working: Google Drive photos and scheduled rotation. Images from the free library keep working as normal. Your color set, density, event colors, labels, and dark mode are all native Google Calendar settings. A lapsed subscription has no effect on them. That is another reason to complete the free steps first.
References
[1] Google Calendar Help, "Change event color set & density in Google Calendar," 2026. Official documentation for the native color set and density settings. https://support.google.com/calendar/answer/15619910
[2] Google Calendar Help, "Use labels to track calendar entries," 2026. Official guide to labelling calendar entries for tracking. https://support.google.com/calendar/answer/12377581
[3] Google for Developers, "Google Calendar API Colors reference," 2026. The API reference listing Google Calendar event and calendar color definitions. https://developers.google.com/workspace/calendar/api/v3/reference/colors
[4] Unsplash, "Unsplash License," 2026. The license governing free use of Unsplash images. https://unsplash.com/license
[5] Chrome Web Store, "Backgrounds for Google Calendar," 2026. The Chrome Web Store listing for the extension discussed in this article. https://chromewebstore.google.com/detail/backgrounds-for-google-ca/ckphndgaidhndacbmjomlcnkjhlcnikb
#googlecalendar #decorate #aesthetic #customization #how-to
Try CalendarBG for Free
Customize your Google Calendar with beautiful backgrounds. No credit card required.
Add to Chrome — It's FreeRelated Articles
What Is Calendar BG? Google Calendar Backgrounds Explained
Calendar bg is short for calendar background: the image or color scheme behind your calendar grid. H
What to Check Before Installing a Google Calendar Background Extension
A google calendar background extension puts a custom image behind your grid. How to check permission
Family Shared Calendar: The Complete Setup Guide for...
A family shared Google calendar is essential for eliminating scheduling conflicts and distributing t